InterfaceBuilderで画面遷移をさせる
この前、CoreDataを使ってみていました。その時に、「画面遷移させる方法がよくわからない」と感じていました。CoreDataもわからないし、画面遷移もわからない...となってしまって、ウガウガしていました。それでも、CoreDataについては「CoreDataのxcdatamodeldと、xcdatamodel - めも帖」で、個人的には大分、ぼんやりとですが分かってきた気がします。
そこで、画面遷移についても整理したいと思ってまとめてみました。
新規プロジェクトを作る
- Navigation-based Applicationを選択
- 「TestApp」という名前を入力
※余談なんですが、Navigationについても、よくわかっていません。xibをいじってみると、なんとなく分かってくるんですが...
タイトルを設定
RootViewController.mを編集します
ナビゲーションの部分にタイトルを表示します
- (void)viewDidLoad
{
    self.title = @"ナビゲーションテスト";
    [superviewDidLoad];
}
UITableViewの設定
セクション毎の設定をします。UITableViewの設定の豊富さに、呆れてしまいます。
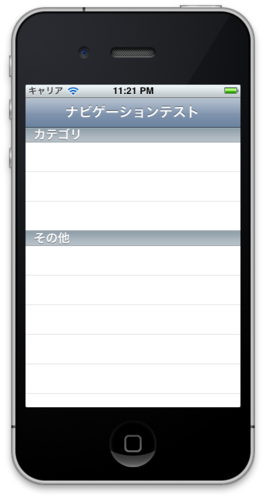
- カテゴリ、その他というセクションを用意
- カテゴリのセクションには、3つのセル。その他のセクションには、2つのセル
// セクション数
- (NSInteger)numberOfSectionsInTableView:(UITableView *)tableView {
    return 2;
}

// セクション毎のセル数
- (NSInteger)tableView:(UITableView *)tableView numberOfRowsInSection:(NSInteger)section
{
    switch(section)
    {
        case0:
            return 3;
        case1:
            return 2;
    }
    return1;
}

// セクションのタイトル
- (NSString *) tableView:(UITableView *) tableView titleForHeaderInSection:(NSInteger) section
{
    switch(section)
    {
        case0:
            return@"カテゴリ";
        case1:
            return@"その他";
    }
    returnnil;
}
セルに文字を表示
セルに文字を表示させます
cell.textLabel.textという書き方に変わったそうです
以前は、cell.textという書き方で、これでも動きましたが、注意されてしまいました
// セル毎の設定
- (UITableViewCell *)tableView:(UITableView *)tableView cellForRowAtIndexPath:(NSIndexPath *)indexPath {

    staticNSString *CellIdentifier = @"Cell";

    UITableViewCell *cell = [tableViewdequeueReusableCellWithIdentifier:CellIdentifier];
    if (cell == nil) {
        cell = [
[[UITableViewCellalloc] initWithStyle:UITableViewCellStyleDefaultreuseIdentifier:CellIdentifier] autorelease
];
    }

    //
    cell.textLabel.text = @"セルのタイトル";

    //
    return cell;
}
セルに文字を表示
先程のままだと、「セルのタイトル」という文字だらけになるので、調整。
セクションや、セルに合わせて文字を変更
// セル毎の設定
- (UITableViewCell *)tableView:(UITableView *)tableView cellForRowAtIndexPath:(NSIndexPath *)indexPath {

    staticNSString *CellIdentifier = @"Cell";

    UITableViewCell *cell = [tableViewdequeueReusableCellWithIdentifier:CellIdentifier];
    if (cell == nil) {
        cell = [
[[UITableViewCellalloc] initWithStyle:UITableViewCellStyleDefaultreuseIdentifier:CellIdentifier] autorelease
];
    }

// セクション毎に、セルごとにタイトルを入れる
    if( indexPath.section == 0 ) {
        if( indexPath.row == 0 ) {
            cell.textLabel.text = @"jkondoの日記";
        }elseif( indexPath.row == 1 ) {
            cell.textLabel.text = @"naoyaのはてなダイアリー";
        }elseif( indexPath.row == 2 ) {
            cell.textLabel.text = @"tapestry";
        }
    }elseif( indexPath.section == 1 ) {
        if( indexPath.row == 0 ) {
            cell.textLabel.text = @"めも帖";
        }
    }

    // セルを返す
    return cell;
}
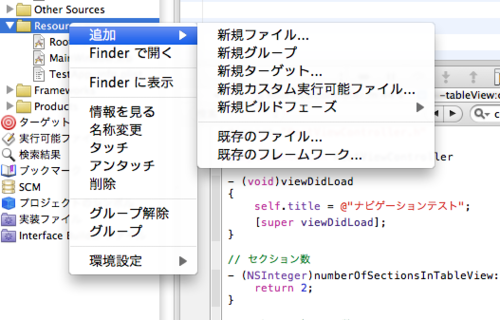
xibファイルを追加

InterfaceBuilderでレイアウトをするために、下記のファイルを追加
個人的にですが、Resourcesのフォルダにいれています
- webView.xib(UIWeb)
- tableView.xib(UITableView)
controllerファイルを用意

用意したxibファイルを動かすためのClass(Controller)ファイルを用意
Classesフォルダ(これも個人的には、このフォルダに入れてます)に新規ファイルを用意します
- WebViewController
- TableViewController
TableViewController.mの部分を書き換える
セクションの設定時に、文字列を返しているので、コンパイル時にエラーになります。
適当な数値に書き換えておきます
- (NSInteger)numberOfSectionsInTableView:(UITableView *)tableView {
    return 1;
}

- (NSInteger)tableView:(UITableView *)tableView numberOfRowsInSection:(NSInteger)section {
    return 1;
}
webController.hを編集
Outletと、UIWebViewに渡すための文字列urlを設定しておきます
#import <UIKit/UIKit.h>

@interface WebViewConroller : UIViewController
{
IBOutletUIWebView *web;
NSString *url;
}

@property(nonatomic,retain) UIWebView *web;
@property(nonatomic,retain) NSString *url;

@end
xibファイルの設定
RootViewController.h
RootViewController.hを設定
importを追加します
#import <UIKit/UIKit.h>
#import "WebViewController.h"
#import "TableViewController.h"

@interface RootViewController : UITableViewController
{
}

@end
WebViewController.m
指定したURLを開くための処理を入れておきます
@synthesize url;
@synthesize web;

- (void)viewDidLoad {
    [webloadRequest:[NSURLRequestrequestWithURL:[NSURLURLWithString:url]]];
    [superviewDidLoad];
}
RootViewController.mを編集
セルを選んだ時の処理を入れます
今回は、safariで開いたり、UIWebViewで開いたり、UITableVIewで開いたりします
- (void)tableView:(UITableView *)tableView didSelectRowAtIndexPath:(NSIndexPath *)indexPath
{

    // 実際の切り替え処理
    if (indexPath.section == 0) {
        if (indexPath.row == 0) {
            // safariで開く
            NSURL *url = [NSURLURLWithString:@"http://d.hatena.ne.jp/jkondo/"];
            [[UIApplicationsharedApplication] openURL:url];
        }elseif (indexPath.row == 1) {
            // safariで開く
            NSURL *url = [NSURLURLWithString:@"http://d.hatena.ne.jp/naoya/"];
            [[UIApplicationsharedApplication] openURL:url];
        }else {
            // UIWebView
            WebViewController *webView = [[WebViewControlleralloc]initWithNibName:@"webView"bundle:[NSBundlemainBundle]];

            webView.url  = @"http://d.hatena.ne.jp/reikon/";
            webView.title = @"WebViewのテスト";
            [self.navigationControllerpushViewController:webView animated:YES];
            [webView release];
        }
    }else{
        // TableViewでの表示
        TableViewController *listView = [[TableViewControlleralloc]initWithNibName:@"tableView"bundle:[NSBundlemainBundle]];

        listView.title = @"TableViewのテスト";
        [self.navigationControllerpushViewController:listView animated:YES];
        [listView release];
    }
}
感想
iPhoneのアプリを触っていると、思うのは豊富な画面遷移方法があること。なので、今回は一例だけまとめてみることにしました。
InterfaceBuilder(IB)を使うなら使うで、開発方法を決めていかないと、あれこれ混ぜてやってしまうと、後々面倒なことになりそうです(というか、なりました)。
IBは、便利なんですが、奥の深いツールのように思います。また、情報が見当たりにくい(操作方法を検索しにくいだけかもしれません)。それだけに、分かり始めると、便利そうなツールに思えます。もちろん、Xcodeで書くことで設定することもできるんでしょうけれど...
WebとiOSの違いも感じました。Webだと、基本的にリンクで画面が遷移します。リンク要素はHTMLで定義して、CSSでレイアウトする。これに加えて、JavaScriptで演出を加えたりすることも出来ます。
そんな違いを感じずにはいられませんでした


